Ornate Iron Grave Marker, A Tom Latane' Class
Created: December 13, 2023
French Creek Valley Home
Back to Blacksmithing
Guild of Metalsmiths
Calibrate Yourself
Contact Us
Tom Latane' Grave Marker (Cross) Workshop Notes, October 2006,
Held at Tunnel Mill
--------------------------------------------------------------------------------------------------------
Table of Contents.
Opening Paragraph
Outer ends of Horizontal Arms
Inner Ends of Horizontal Arms
Chasing Arms
Top section of Cross
Rooster at Top of Cross
Decoration Below Flag
Options
Tom's Multiple Welded Scrolls
Method 1
Method 2
Dangling Leaves (Tears)
Attach Leaves
Making 4 Scrolls (Alternate demo, not part of project)
10" OD Circle
Flag
Base Bar of Cross
Assembling Cross
Method 1
Method 2
Tom's small Scrolling Tongs
---------------------------------------------------------------------------------
Tom Latane' Grave marker (Cross) Workshop, October 2006,
Held at Tunnel Mill
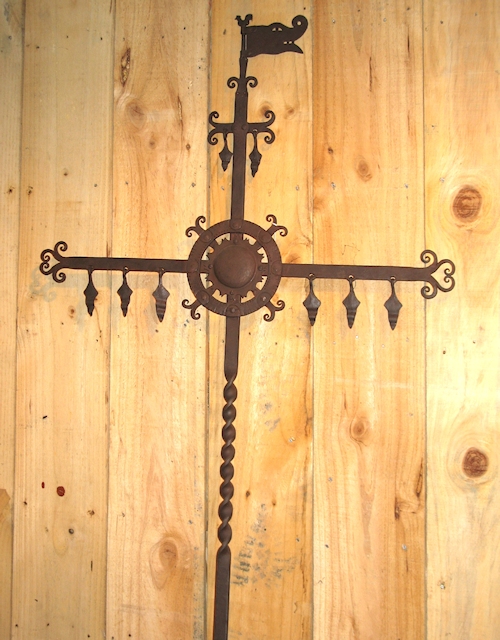
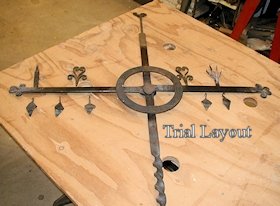
Tom's Completed Cross
Tom ran this four day workshop for a full house of students. During the project build, we learned a lot about the history of this style of grave marker/cross and even took a local field trip to see some of them in place. As usual, the project started with a outline of the work to be done and the handing out of the materials.
Once we got down to business, Tom would perform a component demonstration, then we would do our best to duplicate his work, with Tom there to offer helpful hints and to correct problems that we had caused ourselves. This process was repeated several times as we worked through the weekend, with occasional breaks for history lessons and demonstrations of optional processes.
Materials For the Basic Cross:
(2) Horizontal Arms: 18" of 1/4 X 1" or 1 1/4 X 1"

Vertical Top: 18" of 1/4 X 1" or 1 1/4 1"
Vertical Base: 48" of 1/4 X 1" or 1 1/4 X 1". -Option: The lower base might be better if made from 5/16 X 1 1/4".
-Whichever width is chosen, the four parts of the cross should be the same width. The base vertical can be made of the thicker stock for greater strength.
-All four legs ultimately get riveted together at the center. The overall height of the finished cross is to be about 5 1/2 feet.
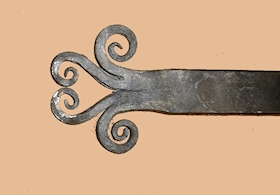
Outer ends of horizontal Arms:
General notes:
The horizontal arms will terminate in four scrolls split from the bar, the two outer scrolls rolling outward and the inner scrolls rolling inward.
The scroll ends or "tines" must not be too thin, so they don't rust away.
Tom's scroll cutting procedure:
-Slit half way through from one side, on the anvil.
-Finish the cut by slitting vertically, in a vise, from the end of the bar to the root of the slit.
You may have to do this an inch at a time to avoid bending the stock badly.
The chisel, splitting from the end, should tend to follow the path established by
chiseling from the side and should leave a bit of flat on the edge of each tine.
Do not file all of the bevel off. This would waste too much material.
A half round file can be used to clean up any mess along the cuts and insure
that there is a little bit of flat to receive the first hammer blows when tapering the tines.
The edge of the half round file is what allows you to get all the way to the root.
There will still be some bevel, and, if the stock was 1/4" x 1" the cross section will be more square.
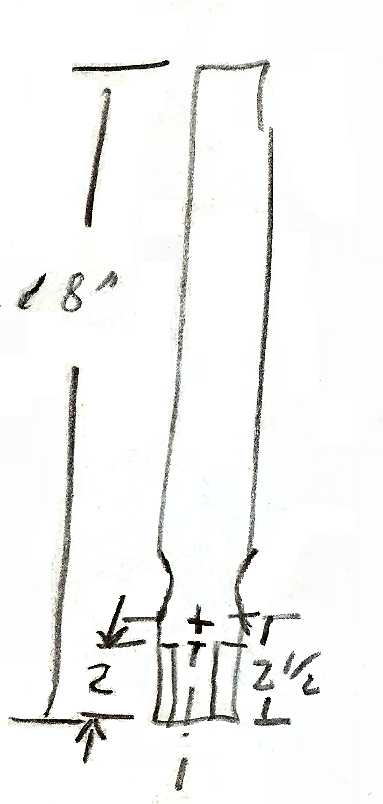
Process for Outer ends of horizontal Arms:
1. Mark the center line to 2 1/2" from the end, with a cold chisel.
2. Mark the two quartering lines to 2" from the end, with a cold chisel.
3. Starting with the center mark, hot chisel half way through --- lube chisel with lard or beeswax
4. Place chiseled end upwards in vise, chisel down to root, as above.
-Stock may bend as you chisel down, so:
-Do center mark first, part way, and straighten
-2nd heat; all the way to the root, and straighten
-Clean up the slit with a half round file, but don't waste material
-Straighten and close up
-Splitting the bar in half then each half in half is more likely to result in even tines than would splitting all four tines at once.
5. Chisel one quarter line as above, then the other.
6. Evenly heat all 4 tines then flatten, straighten, and close them all up together. Look for symmetry.
7. Using a round faced hammer over the horn, neck down or fuller behind the center slit.
This creates symmetrically shallow arcs into the stock that will ultimately flow or transition into the scroll of the outer two tines.
Note: Do NOT slim down the tines in this process!
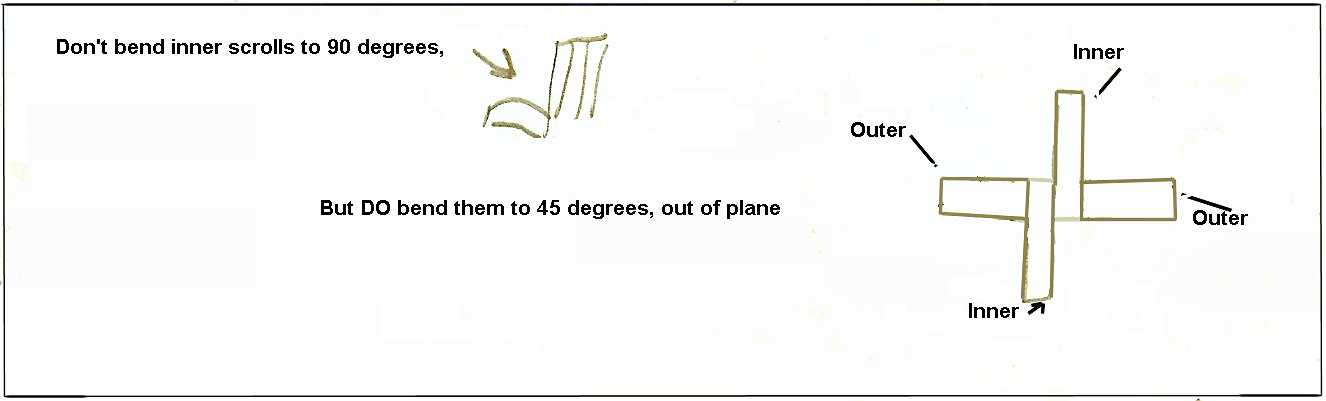
8. Using a chisel, spread the outer scroll tines out to about 45 degrees. Using a dull pein hammer,
bend the inner scroll tines out of that plane in opposite directions to about 45 degrees.
Splaying out the tines this way facilitates the ability to work on each tine individually, without creating kinks at the base of the tines.
-If a tine base is too thick, reheat and use an OLD half round file to correct.
*** You REALLY need to have SMOOTHLY tapered tines or the scrolls will kink and won't roll up evenly!
-Goal is that each PAIR of tines be identical, otherwise the scrolls can't be symmetrical.
-Get each tine as straight as possible before scrolling them up (as before, closing all four up) because little kinks are hard to fix later.
-When closing, Tom works the bases together before the ends.
-Once all four of the tines are closed up, make sure that all ends are the same length.
If not, cut off the longest. Take off twice the "overage" and then draw back to a point, etc.
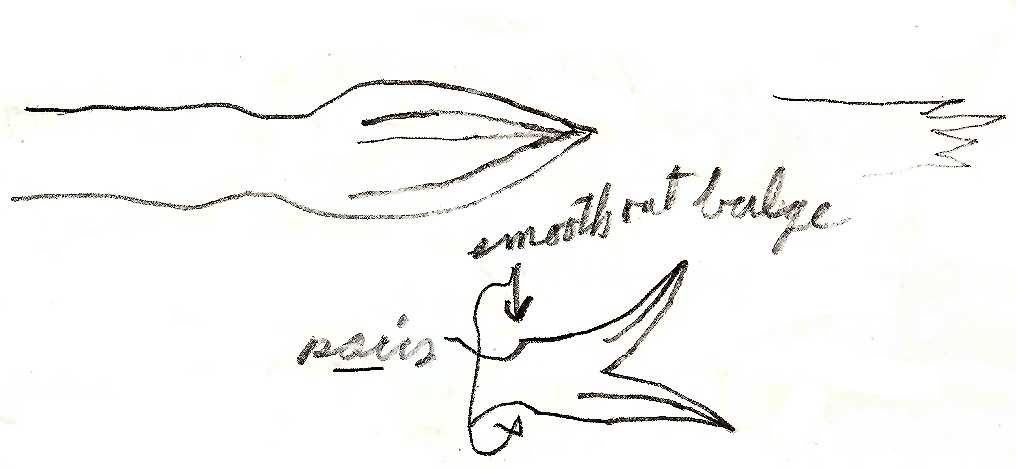
9. To open up:
-Separate them in pairs down the center line first.
-Smooth out the bulge that will probably form behind them.
-Spread just enough to "catch" with a hammer.
-Open the outer one a little more with chisel and/or hammer
-Ignore inner scrolls for now.
-Get the END of the scroll curled first (Tom used special little scroll pliers for the final moves here).
-Goal is a 1 1/4 turn scroll
-Make the other outer scroll to match.
-Use a hammer to close the scrolls, use scrolling tongs to open.
10. Form the inner scrolls in the same manner and adjust them all as needed to make a pleasing look.
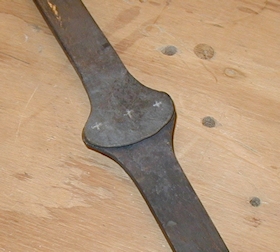
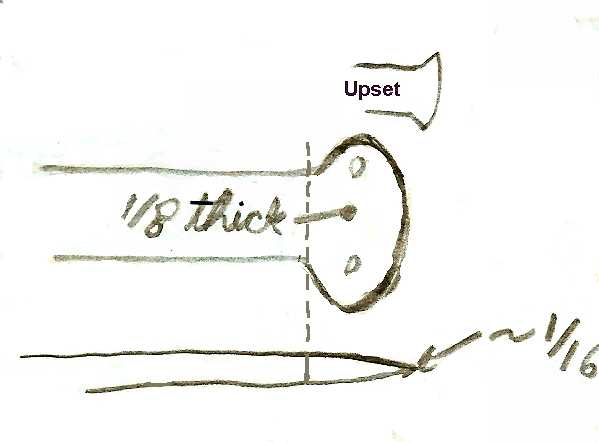
Inner ends of horizontal Arms:
Take a hot 3" heat on the inner end of an arm and, in a vise,
upset back about 1/.2" so the end gets about 1/2" wider (was 1" wide, now about 1 1/2" wide right where the upset is)
-Now draw out the upset into a "bean" shape that is about 2" wide.
Goal is to get the center of the bean to be about 1/8" thick, tapering the very edges of the bean to about 1/16" thick.
Make the taper on the front of one bean and the back of the other bean.
This creates a flat scarf joint when the two arms are riveted together later on.
Each "bean" will eventually get a total of 3 rivets through it.
Chasing the Arms:
Select a design for the arms, and mark it out carefully.
Chisel cold to set the marks, then chisel hot to make bold lines.
-Note: There will be a Ring at the center of the cross so your chased pattern should remain between the Ring and the outer scrolls.
1. Bevel the upper and lower edges of the arms to give the arms more width and to emphasize the curve before the scroll.
Tom beveled about 1/4" to about 45 degrees on 1 1/4" stock, so maybe a little less on 1" stock.
2. Chase a straight line JUST inside the bevel, using a fairly blunt chisel (sharper than a fuller).
Tom likes to chisel toward himself. This chisel doesn't have much radius at the ends.
3. Fancy up your design any way you want.
Top section of the Cross:
Possible decorations for the very top of the Cross:
-Heart scrolls like cross arms
-Angel
-Rising Sun
-Rooster (that's what we will do)
Just below the top decoration, we will have a "Flag" as part of the design.
So the end result will look sort of like a rooster sitting atop a flag pole with flag flying.
Then below the flag will be an option for yet another decoration.
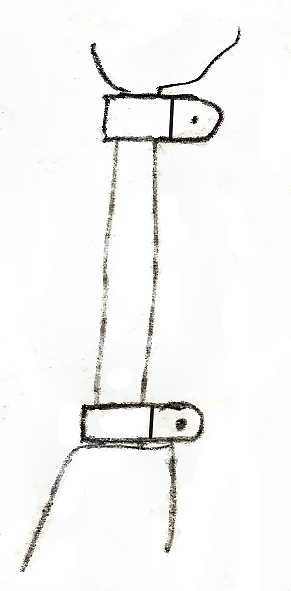
The first task is to produce the pole or pivoting point for the flag,
leaving enough material at the top for the rooster. About 1 1/2" in from the end of the bar neck down or fuller
to isolate a 1 1/2" to 1 3/4" length to forge round.
This round section is to be about 5/16" to 3/8" in diameter and about 4" long.
Using a spring fuller, make 2 notches, centered about 1 1/2" to 1 3/4" apart with the first notch just below the "rooster".
The 4" length goal is so that you can span it flat across your anvil for the final shaping and rounding.
If your anvil width is different, adjust accordingly.
Filing will likely be required to achieve the final roundness, and the square shoulders at the top and bottom.
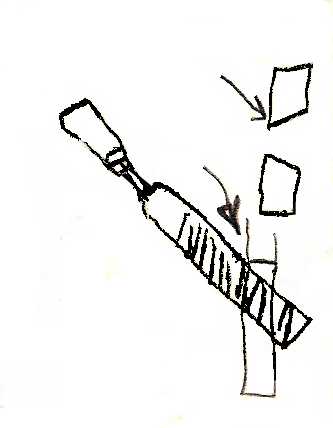
Note: Spring Fuller down only about 1/4". You can always go deeper later, but you can't get the material back!!!!
Now, drive as per arrows to avoid cold shuts later on.
-File off any possible cold shuts( as of) if they occur.
-Fuller out till the pivot area fits across the anvil.
-Round up (hammer) the pivot, particularly at the top and bottom 1/2 inch or so (the area where the flag straps will actually pivot).
Note: As you draw out this round section, be aware that you are trying to produce a diameter that is larger than the parent stock,
so don't thin out too much as you do your drawing and rounding.
Again, you are after a finished diameter of about 5/16" to 3/8"!!!
Finish rounding up with a file at the top and bottom.
Dress the bottom of the pivot.(actually, the pivot should be centered early in the process. One might want to check now that it is still centered)
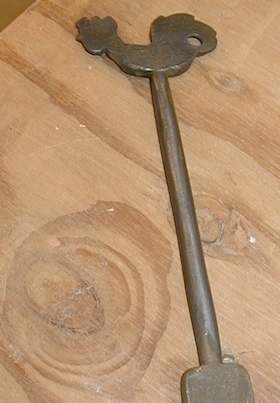
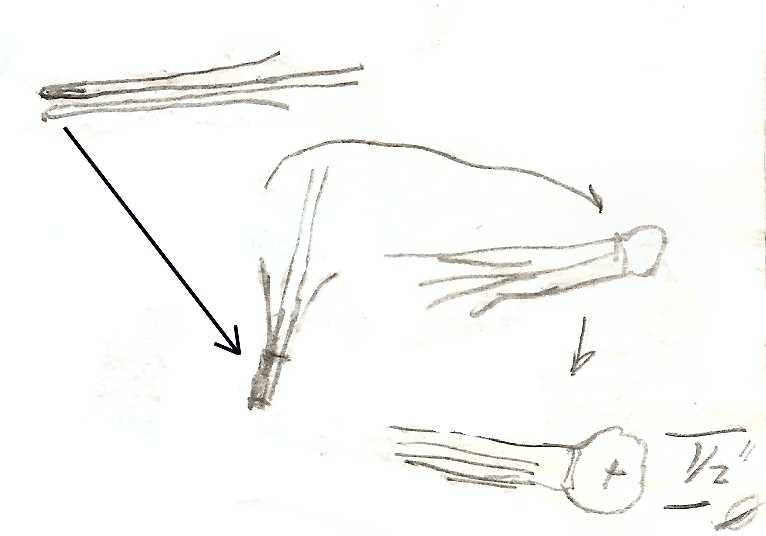
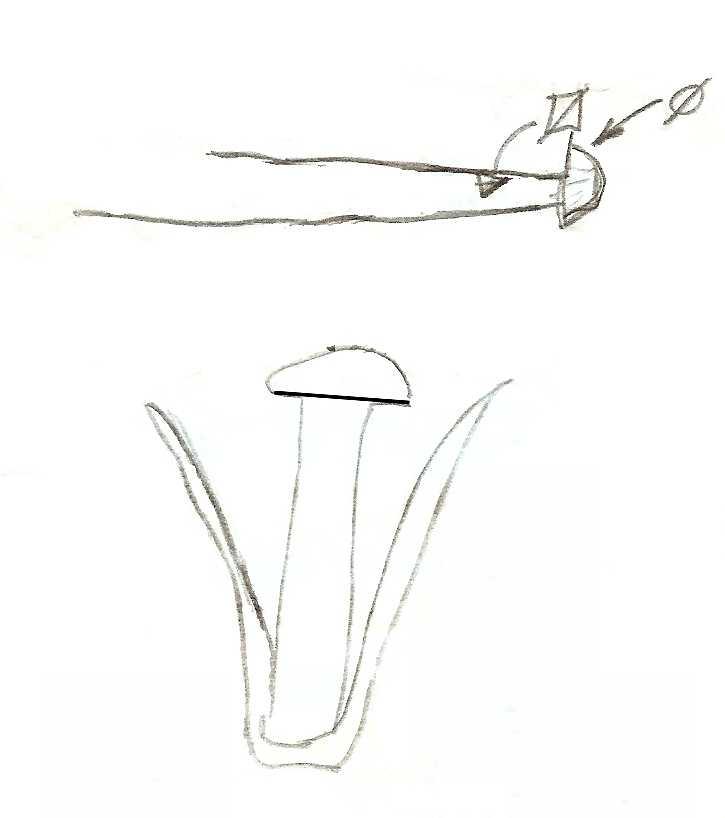
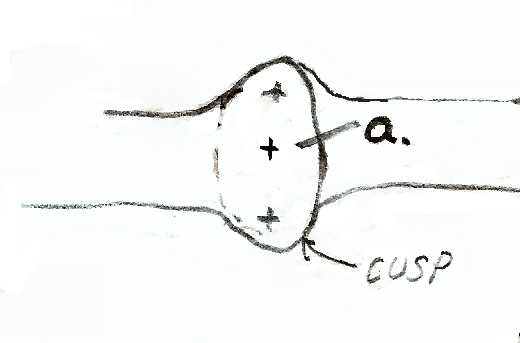
Rooster at Top of Cross.
-Heat the material at the end of the stock which will be the rooster and taper its width slightly, leaving it at full thickness.

-Reheat end, place stock in vise so the bottom of what will be the base of the rooster is resting on the jaws and tighten slightly (don't want to ruin the pivot).
-Now chisel down about 1/2 the depth of the stock and a little off center.
-Reheat and, using a narrow fuller, fuller down a little deeper than the chisel went. This widens the opening to about 1.4" (it'll get wider later).
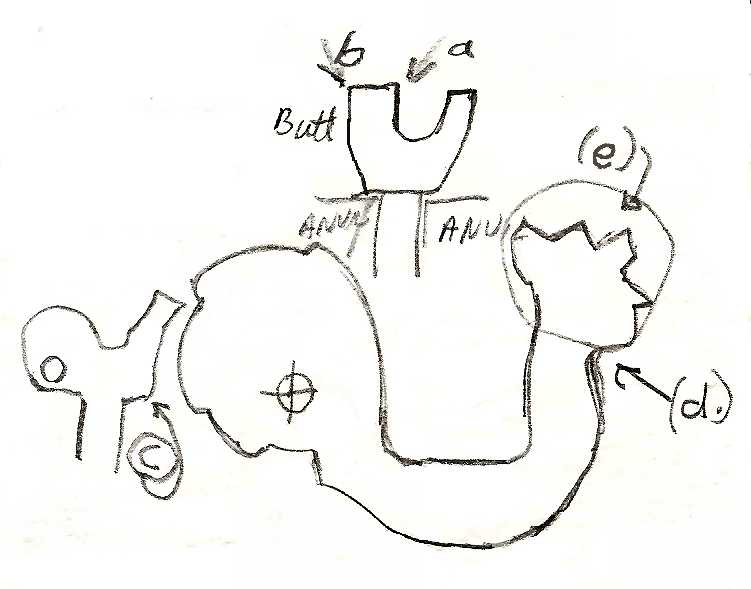
-Reheat, go in with a 3/8" wide fuller, to achieve the final opening.
-I'll quit saying "reheat" because that should be obvious by now.
-Tail:
-Upset the biggest part of the shape against the shoulder hitting at (a). It'll become the tail.
-Knock the tail top backwards a little, away from the centerline.
-Fuller out the tail to make it larger.
-Punch a 1/4" hole near the bottom of the tail, and then drift it to about 3/8". Starting at this hole, and using a chisel,
hot cut out a bit of material in order to separate the rooster butt from the tail feathers.
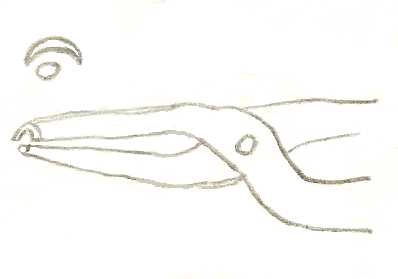
-Head:
-Pull out the area that will become the breast (c).
-To form a chin, reheat, cool tail, drive in part way up the so-far unforged side to begin forming the chin (d).
-Fuller to lengthen head (e)
-Shape to suggest head (e)
-Rooster goes into vinegar overnight to remove the fire scale. Then file to final shape.
Decoration just below the flag:
Many designs can be used for this area. Tom showed us 2 of them.
1. An "Urn."
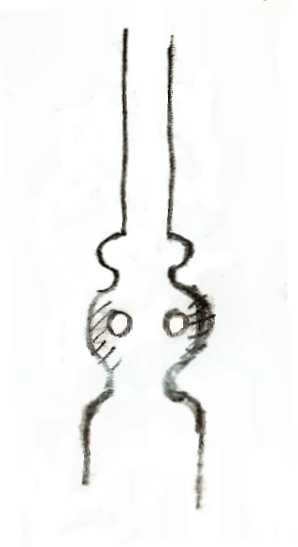
-Fuller in JUST below the pivot and again an inch or so below that. This creates the body of the vessel.
-Punch 2 1/4" holes, side by side evenly between the fuller marks. This creates the handles of the vessel.
-Spread those holes a little.
-Taper/Fuller/Widen the sides beyond the holes.
-Adjust: Straighten all with hammer, final adjustment with files.
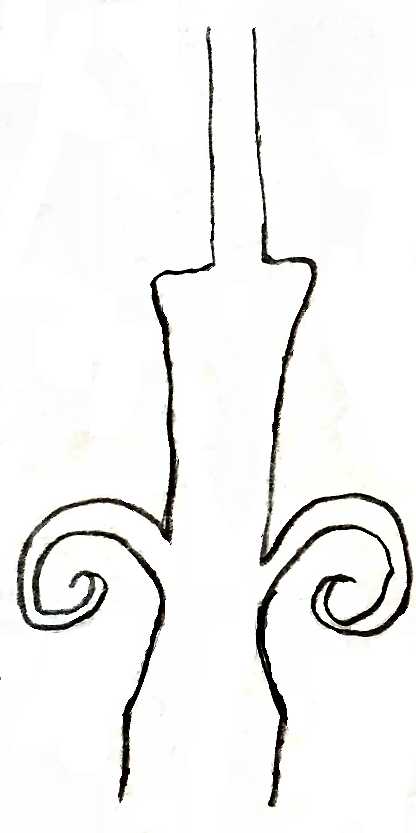
2. "Peeled-Off Scrolls"
Starting about 1/4" below the pivot, chisel down about 2" at an angle that produces a tapered spike on each side of the bar.
For good structure, be sure to leave the stock at the narrowest point between chisel cuts WIDER than 1/3 of the width of the parent stock.
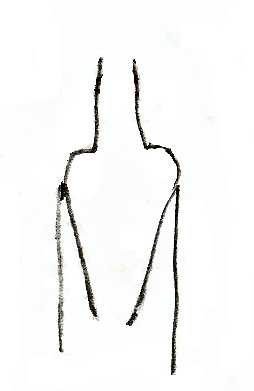
Fuller in just below the "spikes" as described previously in the Cross Arms.
Blend the scroll root area and fuller area as needed.
Peel the "spikes" out, draw out, and scroll also as described previously.
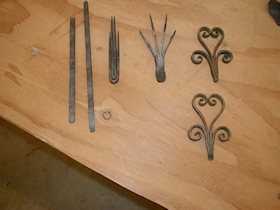
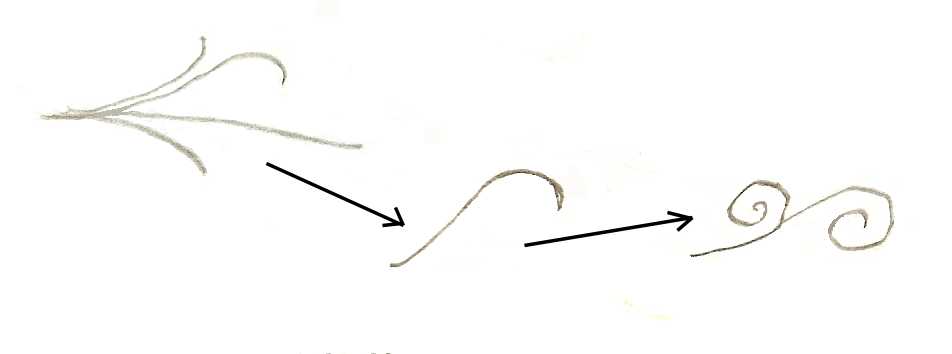
Tom's multiple welded Scrolls
Tom showed 2 different ways of making these neat little "Add on" scrolls.
Method 1:
Each element takes 2 pieces 1/4" round by 6 3/4" long.
Draw out to about 5/16" to 3/8" wide and about 1/8" thick at the center with ribbon taper at all the way to both ends of each piece.
Draw both pieces to same length.
Nick both ribbons a little off center, and identical.
Fold each ribbon over tight at its nick,
Gather the tapered ends of the nested ribbons with your tongs. The longer tines should be back to back.
It may help to curve the tine tips slightly so when held in your tongs, the nicked ends are tight together.
Heat and flux the nicked ends and weld, twice.
Presumably, we could rivet these decorations onto the Cross Arms or Cross Top in symmetrical pairs.
So we need to create a mounting rivet pad at the base of the collective tines.
Do this by holding about 1/4" to 3/8" of the welded end over the anvil and striking with the half the hammer head over the anvil and half off the anvil.
(It should be oriented so that all four tines are touching the anvil?).
This creates a clean shoulder making about a 1/2" wide flattened pad for a rivet.
If you get a bad weld, cut off the bad part, and reweld it. (Tom upset the weld area in the vise)
Shoulder the pads to about 1/2 the original thickness. (You don't need a very big pad)
Punch a 3/16" rivet hole.
Scrolling:
Evenly heat and open out the 4 tines.
Tom started about 3 of the scrolls with the hammer over the horn.
Start the inside of the scroll with scroll tongs, following up with pick-up tongs to adjust.
To adjust, Tom laid the scroll on the anvil (for support) then used the tongs to gently close the scroll forms. This works very well.
First one side, then the other to match.
Method 2: (A BETTER way!)
Make 2 ribbons for the scrolls by drawing out 1/4" round stock as described in method 1, except:
-Start with one piece of stock 6" long and one piece of stock 7 1/2" long.
Flatten, draw and taper as before. My parts grew to about 8" and 10 1/2".
-Nick the longer ribbon in the center and fold IN on the nick for a tight fold.
-Fold the shorter ribbon, also centered, but without a nick, nesting the longer ribbon inside without any gaps.
-Grab the tine tips with your tongs, flux, weld, refine, and shoulder a pad as before.
This method works better because the 2 pieces are continuous at the weld area so there is more strength to resist
splitting when being punched and the outer piece holds the whole thing together during the welding process.
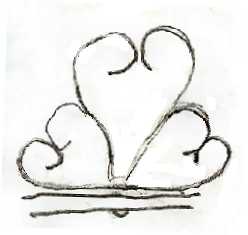
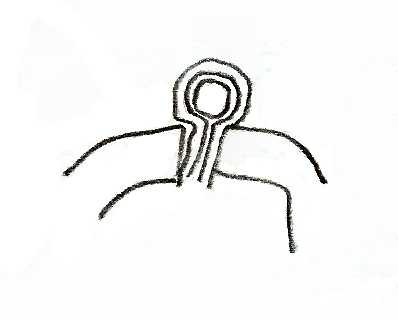
Variation on a Scroll- Note:
File a square tenon on the forge welded scroll base, rather than a rivet pad.
This can fit into a drilled and filed socket on the Cross.
You would do this if you wanted to add more scrolling to the scroll that you just made.
The additional scroll could be a C scroll with a square hole at its center to accept the tenon.
Then align the original scroll tenon through the C scroll hole and into the socket.
Peen over the square tenon to hold it all together.
See next sketch; this looks like 3 hearts when completed.
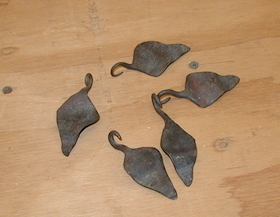
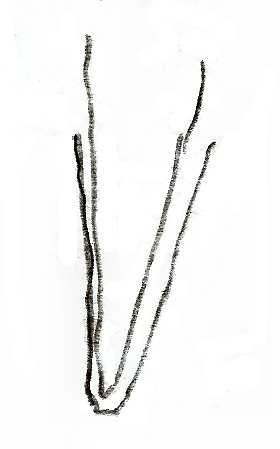
Dangling leaves (Tears?)
These leaves symbolizing the tree of life, or "Tears" as they are sometimes called, dangle from the bottom of the Cross Arms.
Each leaf has a short stem that is poked through a hole pierced in the cross arm and turned into a ring to close.
It seems that 4 or 5 leaves per cross arm side will be about right for the cross we are making.
Stock: 1/8" X 3/4" or 1" (depending on the your desired leaf size)
We will use 3/16 X 3/4 or 1/8 X 1.
-Cut the bar off at about a 60 degree angle, the steep way (gives you a real sharp point)
-discard the drop.
-The angle gives you a head start on the stem and each succeeding leaf will be cut off the bar at this same angle.
-Heat and place the point on the anvil.
Shoulder down at a little more that half the length of the diagonal and continue drawing out the stem to about 2 inches long.
-Bend the stem to about a half the angle of the original diagonal.
-Cut the leaf off the bar at the same diagonal as before, and you have a leaf blank which is diamond shaped.
-Next, fuller the leaf to make it mostly wider, and only a little longer.
-Smooth it up, but do leave a ridge down the center.
-Add ripples to the leaf. (Tom has a swage for this) You can use scrolling pliers to bend up, then down, etc. or make bends on step of anvil.
-No veins are needed.
-After making a sample, I decided how much stock each leaf would take.
Then I marked out my bar for all the leaves to make it more likely that they'd all come out the same size.
-Make 5 or 7 more. (Consider an odd number per Arm for aesthetic reasons)
-If your leaves do not all turn out the same size place the larger ones nearer the center of the cross.
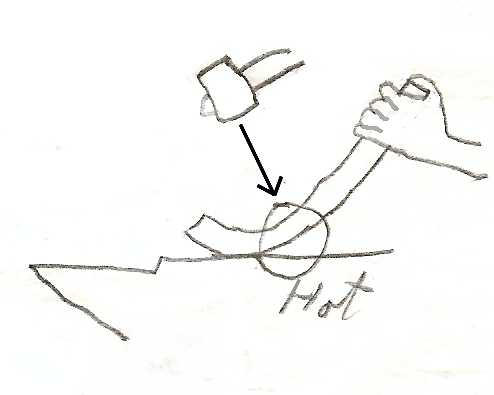
Attach leaves to horizontal Arms
1. To make short slits in a line on the horizontal Arm:
-Draw a line just at the inner edge of the lower beveled edge of the arm.
If you chased lines across the top and bottom edges of the arms the splits will be in the lower chased line.
-Lightly center punch location for slits.
-Use a 3/8" or 1/2" hot cut chisel.
-Wax up chisel- beeswax thinned with lard; lard allows the cold tool to pick it up.
-2 hits from front
-2 hits from back
-2 hits from front
-2 hits from back (until you can see some light through the hole)
2. Over the pritchel hole, go through with a 1/4" diameter round punch to open a hole shaped like a human eye.
3. Make a hook on the leaf stem, round it out, close it up, and open it a little.
Make this loop big enough so the leaf will dangle freely in a breeze.
Don't incorporate the leaves until the Cross has been assembled. They're fragile and will just get in the way.
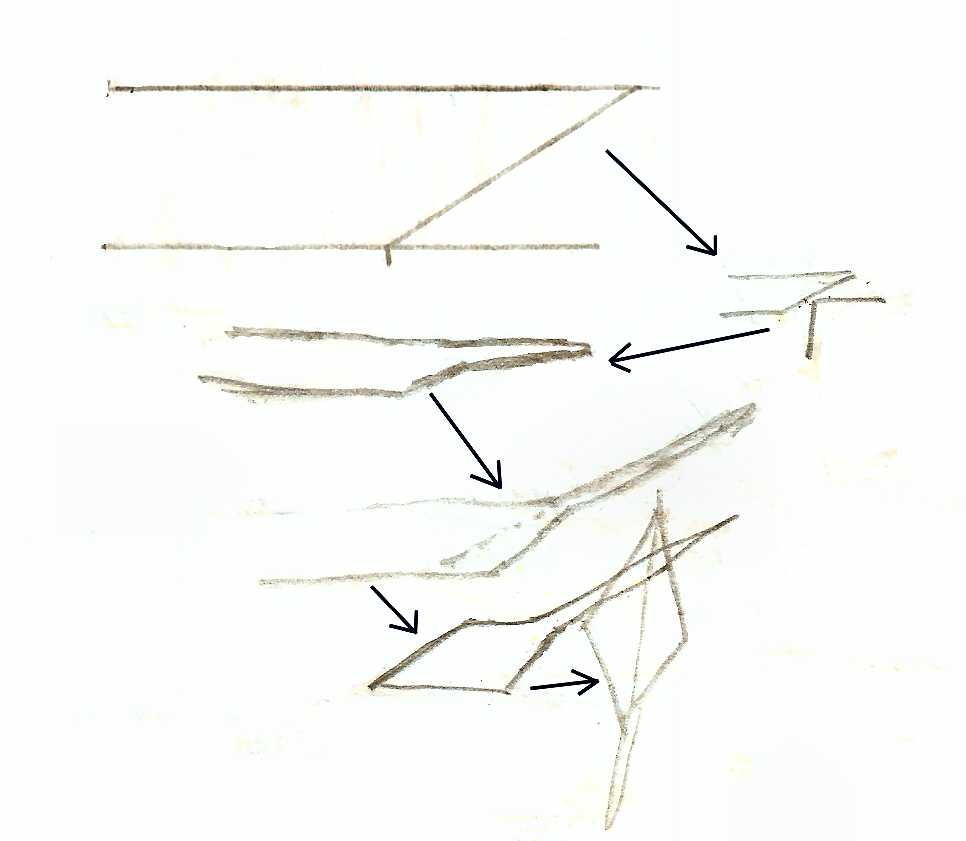
Making 4 Scrolls in pairs at 90 Degree Angles (An Alternative Demonstration by Tom, not part of cross project)
1. Make central stem from which all 4 scrolls will sprout
-Form stem of 3/8" diameter stock
-Neck down the bar about 1/2" from the end and forge a square stem about 3 1/2" long.
-Form button head on the end of 3/8 bar
-Need a fairly sharp edge on your anvil to form the square shoulder.
-Shoulder all the way around to form a button head that looks like a pointy rivet head to me.
-Forge the stem to a pleasing taper from about 5/16" square to about 7/32"" round just under the button.
-Twist the stem to add an additional decoration if desired.
2. Draw out 1/4" round to make scroll ribbons as before, 8" of stock drawn out to about 5/16" wide, tapered, etc.
Note: 1/8 X 1/4 strips would save a lot of time.
-Cut off the stem at about 3 1/2".
-Flatten the drawn out scroll ribbon and bend at the middle around stem.
-Weld
-Squish another scroll piece around this weldment at 90 degrees
-Weld. It's tough to hold all this together for welding!
-Look for any gaps at the bottom after welding. If so, close them up and reweld.

(These could be used standing up on an arm)
-Open out the 4 scrolls and scroll them, rolling toward the center. Each scroll should butt against the central stem when done.
Tom flattened a tab for riveting to the top of cross arms like the other scroll elements.
He may have mentioned that the bottom could be tapped and threaded for attachment into some other project.
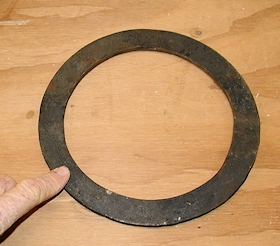
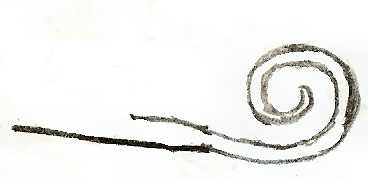
10 Inch OD Circle:
-1/4" X 1" stock
-Cut off enough stock to make the circle. 1" wide stock with an 8" ID will produce a circle with a 9" median diameter.
So, to calculate the length of stock we use the that median diameter times pi. So: 9" X Pi (3.14) = 28 1/4".
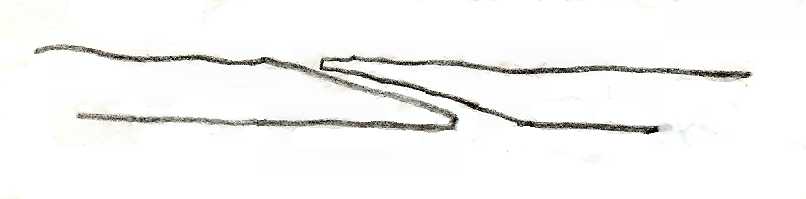
-Form both ends to a scarf joint.
-Sketch ID and OD on a flat, non-combustible surface.
-Start by turning one end. Go to about 90 degrees.
Do this over horn of anvil, or use step of anvil if edge is round, hitting inside with rounding hammer,
while outside is supported by step and front edge of face.
Or, just hold stock at an angle on the face and hit between anvil and support hand with rounding hammer.
-Turn other end to about 90 degrees
-Keep checking curvature against your sketch as you go.
-After both ends are at about 90 degrees, begin closing up the circle, making sure the scarf will come together properly.
-Clean the joint. Flux and weld 2 or 3 times.
-Round up and resize as needed on Cone Mandrel.
Note: Very few Cone Mandrels are really round, so keep rotating the Ring on the cone as you round it up to "average" out the humps and bumps.
Sounds tough, but works pretty well.
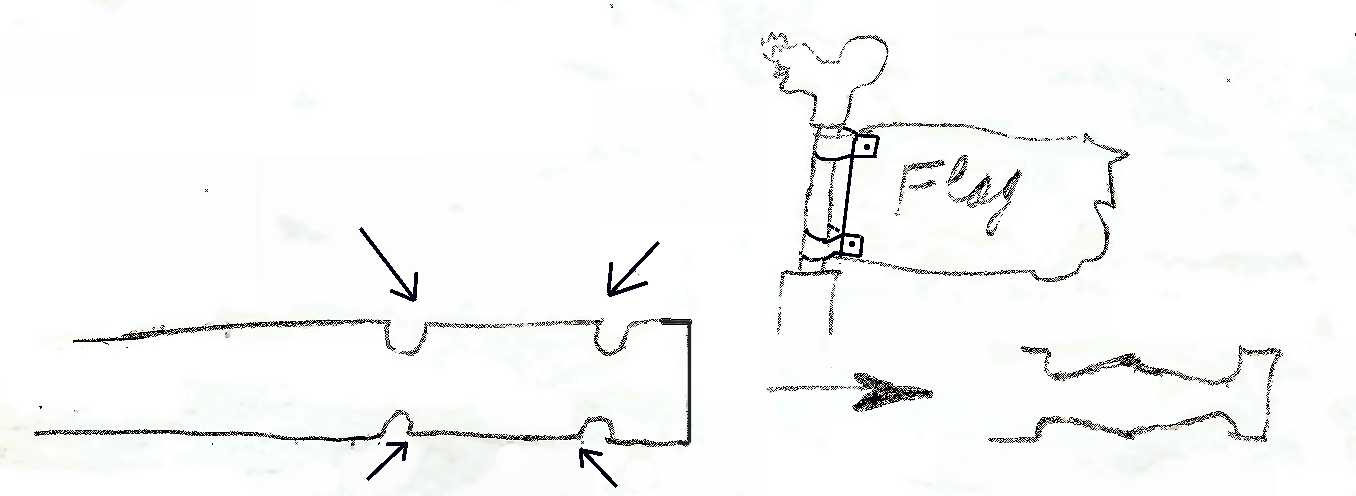
Flag:
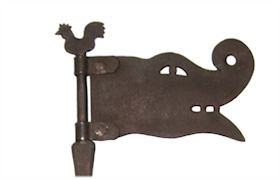
-The flag and its hinge straps are separate pieces.
-Cut the flag from 16 Ga stock. The height of the flag is the same as the length of the pivot on the upper (vertical) cross arm.
Make the length of the flag about 1 1/2 times the width.
-Decorate as desired
-Add ripples (old examples seen in photographs are flat)
-Make 2 hinges from 16 Ga stock. Wider straps are better.
Make them at least 1/2" wide so they won't "cock" and bind on the pivot.
-Cut the rough strips for hinges.
-Make them extra long.
-Make a freehand "U" bend
-Drop them over a round rod that is the same diameter as the pivot,
then place the ends down in the vise and squeeze to make the opening in the hinge nice and round and tight,
so there aren't gaps where they come back together.
-Now cut the hinges to length and drill hole for rivet.
-When drilling mating holes in flag for hinge rivets, hold the flag just far enough away from the pivot so it doesn't touch.
Note:
-Opening the ring formed by the hinge tab to fit the flag between the ends adds to the ID enough to allow free pivoting.
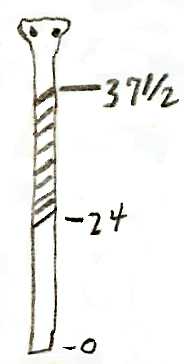
Base Bar of Cross
-Twist 9 facets into the bar. That's 4 1/2 full turns on the 5/16" X 1" bar.
-This twist starts 24" up from the bottom, for 13 1/2".
Note: Visually it is more important to start at a point below the center of the cross that balances
the detail and leaves on the arms than at any particular place at the bottom, as long as there is flat material at the base for mounting)
-Decorate bar as desired, to complement arms and top bar, staying away from the outer edge of the Ring, as before.
-Drill or punch mounting holes at bottom of base as desired.
Assembling the Cross:
Connecting the four arms:
All four legs of the Cross each have a "bean" at the inner ends which will overlap in such a way that each of four rivets will pierce 3 pieces of metal.
And a fifth, and center rivet will pierce all four beans.
Method 1:
-Place the long vertical leg face down on the anvil (the public, front face)
-Place the top vertical leg face down with its beans overlapping long leg's bean.
-Look at the joint from the side. It should be a nice, flat, scarf joint with full contact along the taper.
If not, refine the beans until you get a good fit.
-With the beans aligned, decide where the "center" is, and center punch a mark on the top bean.
Drill a 3/16 hole through both beans at the same time, over the hardie hole so you don't ding your anvil.
-Countersink the front face of the hole of the long leg to accept a flush head rivet. Set aside these two legs.
-Again over the anvil, stack the beans of left and right Arms, as before, and refine a nice scarf joint.
-Again, mark the center and drill the rivet hole through both beans.
-Now stack all four legs, face down, starting with the vertical pair then the horizontal pair.
-Square up the legs to each other and peen the center rivet (with help), but so tight that you can't make some adjustments.
Note: Because commercial rivets have more head than older rivets, Tom uses low carbon round stock,
forming a head on both sides after the rivet material is in place.
Note: rather than use a center rivet, plug welding could also be used, stacking one bean at a time and welding through a center hole.
-Heat up all the beans of this connection, lay flat, faced down on the anvil and tap down
the outer corners of the beans so they lie flat and tight upon each other.
-Check the square-ness again, then drill and rivet, one of the four bean corners.
-Repeat the last step three more times.
-Working face down on the anvil gives you the opportunity to install a circular flat plate decoration on the center of the Cross if you wish, or not.
The resulting bulge from stacking the beans is not a problem as it extends to the rear.
It should be tight, so it's structurally sound.
-With the Cross face up, lay your 10" Ring on top and center it up.
Pencil mark for the center punches in the Ring and drill all four rivet holes.
-Place the Ring back on the front face of the Cross, align carefully and pencil mark one through holes onto one of the Cross legs.
Drill and rivet that hole. With that one riveted, double check alignment and then drill through the other 3 holes.
-With the Ring aligned, with the Cross, push in the rivets and set them.
-Heat the entire intersection and set it together tightly without banging it out of shape.
Method 2:
-Lay main parts together on some bricks for support
-Make flats and bevels of cross pieces match as well as possible.
-Hold things together with a couple pairs of vise grips while making adjustments.
-Don't cover the center punch marks you will be making with the vise grips.
This will allow you to drill holes while the whole assembly is clamped in extra alignment.
-Side pieces first:
-Center punch 2 holes in the front and in the rearmost piece before you start aligning
.
-To get SOME stability, you could make sub-assemblies of the vertical pair and of the horizontal pair
with one rivet at "a" (exact center), but the holes would have to be countersunk and you'd need a flush rivet, so it would not be in the way for later steps.
-If this joint will show, (that is, if you won't be placing a medallion or something over it), use your nicest side of a vertical piece as the forward component.
-You will probably need to get the whole thing hot with a torch to get everything to lie flat.
-Use 3/16" or 1/4" diameter rivets.
-Tom creates the needed alignment bends as he is riveting.
This completes the construction notes for the project.
Final Notes:
-Tom's Small Scrolling tongs:
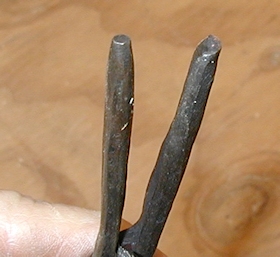
Tom has a pair of scrolling tongs which have one simple conical tapered bit.
The other bit has a half round shape that mates with the other bit's taper.
These tongs are very useful for forming and adjusting the inner ends of the small scrolls we are using here.
The tapered bit goes from about 3/16" diameter at the point to about 3/8" diameter in about 2" of bit length.
The half-round bit has an inner radius of about 1/2" at the outer end and its wall is about 1/8" thick.
-These notes were made from our observations during the workshop and are as complete we can make them.
Feel free to contact me if you have any questions.
----------------------------------------------------------------------------------------------------------